Saturday, May 31, 2008
hanging baskets and saturdays
My baskets are all different but contain alyssum, petunias, geranium, and lobelia. I'd never heard of osteospermum, and consequently don't have any in my baskets. But, it's in a lot of the hanging baskets here - I'm getting some seeds next year for sure.
Since I had to water a lot last year, I'm putting a layer of plastic in my baskets to see if it helps reduce the evaporation. I'm also sprinkling in some osmocote because I read that petunias get really hungry. I totally dig petunias. They're in every basket/pot I own.
Things are going well out at the community garden plot. I reused some landscape cloth that I found on my plot, and I just put it down "as-was. " Turns out, I needed to cut the holes bigger. Apparently, someone else either put seeds in the holes or started with some really small starts. My starts were too big, and needed a little more room. The luffa are pretty sad. Their stalks are firm, and the handyman and I have hopes that they will revive themselves - but the outlook isn't bright. The zukes and pumpkins look great, so I'm already making room in the freezer. Can't wait to stock up again for the winter...
Friday, May 30, 2008
upside down tomato hooks and emma-roo
Emma-roo has never been a nickname for Emma. She's been Emma-bean, Emma-lou, Emma-honey, Emma-remma - the list goes on a long ways but has never covered Emma-roo. And, I gotta tell ya, it probably won't. I was flipping through some pictures, and I found this action shot. (If I call it an "action shot" can I be excused for it's terrible focus?)
When she gets really wound up, Emma races around with her haunches low; it has something to do both with the running and the fact that the big white dog will randomly dart in and pick up one of her back legs in his mouth. He doesn't bite. Sometimes he shakes a little like a shark with a snack, but he doesn't bite down hard. She's not wild about it though. Anyway, when I first saw this picture, little black kangaroo, or Emma-roo, came to mind.
Thursday, May 29, 2008
four great places for dinner in Missoula
But, I just haven't felt like cooking.
Lucky for me, there are some fantastic places to get dinner in Missoula.
First, my absolutely favorite: the Iron Horse. Some day, I will post on all of the wonderful attributes of my favorite blackened salmon caesar salad, but for now, I will just simply mention it. There are fantastic sandwiches and desserts, and their sweet potato fries are an absolute delicious indulgence.
I know MacKenzie River Pizza Company is a chain and they're about as trendy as the Iron Horse, but I can't help but really like them. They don't have that nation-wide chain feel, and they're food is always pretty good. Especially their greek salads - PHENOMENAL feta salad dressing. I really should just spend the $$$ to buy their dressing from their restaurant instead of ordering salads, but I always balk at the $5 or so containers. Another good thing to order? Pesto Fenceposts. They go great with that greek salad.
Then there's Tipu's Tiger (or just "Tipu's"). Everything is fantastic if you can tolerate spicy foods. If not, I hear it's kind of a drag, but my palate likes it hot so I eat pretty much anything they serve. Also, I rarely order fried foods, but it's a habit at Tipu's. I can't turn down the samosas... and I warn you not to try to make me else the beast will emerge.
This last place is quickly approaching the Iron Horse's long-standing status as my favorite. It's Biga Pizza (pronounced "bee-gah"). It's got a great atmosphere, and you can bring your own beer and wine which is a huge plus. I almost never order wine with food because it seems so expensive, yet good wine/beer is one of those things that I love to enjoy with food. So, I bring my wine with me to Biga's, and I almost always order the Vesuvio sans salami with one of their perfectly dressed caesar salads.
Now that I've sat and pondered my list of favorite places to eat, I'll take a tissue and dab up my drool and go find something in the refrigerator to gnaw on.
Wednesday, May 28, 2008
bread knife. danger.
My dad and I took a trip to Missoula a little less than a year after 9/11. It was a short trip, and I took a shoulder bag so I wouldn’t have to check anything. We flew, uneventfully, from Atlanta to St. Paul to Missoula, had a nice tour of the area, and showed up at the Missoula airport ready to travel home. Back in those days, we had our carry-on items scanned when we changed planes so both Atlanta and St. Paul had their way with my luggage. Nevertheless, I was unaware that in my pre-trip haste, I had failed to unpack a side pocket that I used during my large-fruit-eating days in Asheville. (Not sure what precipitated it, but I was totally into melons and cantaloupes… that’s another story.)
When the woman behind the x-ray machine ran my bag twice, I hadn’t the slightest expectation that minutes later she would be brandishing my 13-inch long bread knife saying in a loud, Southern voice, “Honey, I just can’t let you carry this on the plane with you!” Yes, she was southern and in Montana, but I didn’t wait to swap stories on how we southerners were drawn to these mountains. My fellow passengers were beginning to stare at me like I meant to do them harm. That southern woman was rattling off options about mailing and putting it in luggage, but I just kept saying in my loudest hushed voice, “I don’t care. I don’t need it. Please, just throw it away.”
And now my time has run out. My abandoned bread knife sent word that I should be punished for discarding him so quickly when the going got tough. Yesterday, my current bread knife was given the “go” sign, and this is what happened:
And, no, I can't explain why there are so many cuts. Mean, mean bread knife.
So, Mom, go get Dad and have him look at the picture (click on it to make it bigger). It's a tiny cut. It’s a day later, there’s no infection, and I’m going to be just fine. That bread knife on the other hand…
Tuesday, May 27, 2008
raised bed is done... with amenities
Monday, May 26, 2008
the holiday
I am remiss in getting pictures of the handyman's raised beds up. And pictures of the fabulous pumpkin ice cream that we took to Leigh and Matt's the other day. And pictures of my hanging baskets and raised beds. And pictures of Miss Emma who has been as cute as ever since I returned to our snuggling rituals. But soon. In the meantime, I'm dancing like a handyman with wild, reckless abandon. Because it's the holiday. And it doesn't officially end until midnight. Yay for holidays.
Friday, May 23, 2008
i know she doesn't miss me
When I had another two week travel assignment and needed to board her again, I waited until the last possible minute, drove ten miles under the speed limit, and talked to her the whole way: "Emma-Bean, it'll be okay. I'm coming back for you, I promise. I won't be gone long." (the last one felt like a terrible lie, but I said it anyway.)
I parked and opened the back hatch. Emma bounded forth with jowly smiles and that helicopter tail-wag that means she's really excited. There was no need for a leash. We walked to the door... well, I walked. She ran. And once inside, she disappeared immediately behind the counter without so much as a glance over her sweet, little shoulder.
I cried on the spot. Ridiculous, I know, but I don't have kids so you'll have to cut me some slack.
It's obvious that as hard as it is not to be missed, it's great knowing that she's got the kind of dog-personality that doesn't get too unsettled when I can't be around to kiss her on the head or scratch behind the ears.
And, I suppose I do enough "missing" for the both of us.
Wednesday, May 21, 2008
making upside-down tomato buckets
First, you cut the wire cloth in a circle that is smaller than the bottom of your bucket. Next, you cut two holes in the middle that have paths from the edge of the circle so you can eventually slide the tomato plant in.
Then, make sure your wire mesh fits in the bottom of your bucket/container.
Cut the landscaping cloth into circles that are the same size (almost is good enough) as your wire mesh.
Match the holes in the wire mesh with holes in the cloth. Cut different paths from the edge to provide extra structure to hold the dirt up.
Trim leaves from base of tomato plant and put the wire mesh and the landscaping cloth on/around the plants. (You'll want the mesh to be on top, but it doesn't matter too much which goes on first - whatever works for you.)
Turn upside-down. When you take the plastic containers off the plants, you can scootch them closer together. You want to make sure that the stems are in the middle of your mesh holes so they won't get cut or run out of room to grow.
Place osmocote or other fertilizer into bucket of dirt before hanging.
Place buckets in shade so that leaves don't burn while they're turning in their new direction. Last year we had a few leaves that burned (turned yellow) because it was a little too much sun too fast. In a few days the plants will be growing away from the ground.
Mulch the top of the buckets. And move into sun when the leaves have all turned.
So, counting cutting the holes in the buckets, it took about a half day's worth of time to finish the project. And I must admit, I'm not sure everything we did was necessary, but we like the way it looks. There are lots of sites you can find with Google that have other ways to do this - though I think the buckets look better than the bags (and the buckets last year after year!)
Tuesday, May 20, 2008
grapes
Everytime I go in the greenhouse I have to resist the urge to yank one of those suckers out of the pot to see what kind of roots they've made.
Monday, May 19, 2008
aren't those raised beds done yet?
Speaking of helpful hands (mine in particular), anyone remember that wood from Craigslist? Well, it's being put to good use as the walls of the raised bed.
And just to be clear, we don't have stock in ekocompost. That whole 20" high space won't be filled by dirt. There'll be a walking space starting at the little opening on the side (the side that looks like it goes into the yard). There are several walls to come on the inside so the final shape will look like a fancy "c."
So, the answer to the earlier question is "not yet, but soon!"
Sunday, May 18, 2008
raised beds are coming along...
Friday, May 16, 2008
success with the makeshift greenhouse-trailer
Before:
After:
And, remember how ages ago I mentioned the mud room would be a greenhouse? Well it happened, and I must say, it wasn't quite as Martha as I had hoped. It was more jungle-icious. A bit cramped. A bit dark (despite the windows). A bit manky. A bit better in the trailer than in even the south-facing mud room. BUT, it served its purpose and the starts lived. So many thanks again to crazy Kass and her watering.
Wednesday, May 14, 2008
how to make a temporary greenhouse out of a trailer
He already owned the trailer...
The lumber was scrap...
I have no idea where the plastic came from...
And that's a five-dollar bathroom heater from Home Resource. The handyman wasn't really worried about the water/humidity because... well, it was a bathroom heater. Nevertheless, I made him promise me, so I could promise the house sitter, that the garage would not burn down in our absence. We returned to find no pyro-excitement occurred while we were gone. I know that the handyman knows what he's doing, but - whew! - I was relieved to see the garage still standing when we pulled up after being gone three-and-a-half weeks.
Tomorrow, I'll post the "after" pictures of how the plants fared in the temporary greenhouse.
p.s. Thanks, Kassidy! Either you're totally lucky or that thumb of yours is green after all!
raised beds parts 2 & 3
Follow me anyway. (And, Mom, if you ask for one of these for your birthday, don't tell Dad where you got the idea.)
Part one has pictures of sod coming up... use your imagination here.
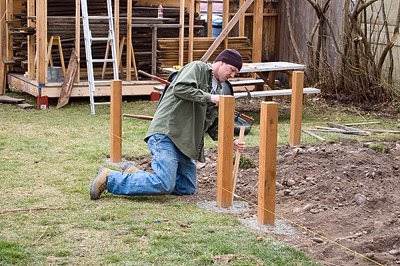
The handyman is pretty particular about how he builds things. My version of a raised bed would be "artistically" asymmetrical - I think that's why I'm taking pictures and not helping on this one.
I found this little guy to be particularly interesting. I've seen a level before (and I actually know how to use it), but I haven't seen this little string leveler. SUPER handy.
I'm not the best "how-to" documentarian because I can't really remember what the handyman is doing here. I believe this was before I was tasked with scooting the leveler-thingy around while the handyman made chalk marks on the posts but after the first round of concrete was watered. Don't quote me.
I forgot to mention that not only is part 1 missing, but I haven't taken pictures of part 4 yet - and then the sides finally go on and the dirt comes in. Seems like forever till we get some plants in there, but I think we'll make by the "last-average-frost" date (and by we, I mean the handyman).